Features of clinical steps
Clinical steps using magnetic attachments for natural teeth are simple. Preparation of abutment teeth and technical operation consist of simple processes such as normal preparation of abutment teeth (root surface), manufacturing of root caps, and mounting of the magnetic assembly. Although it is an advanced treatment technique, no special equipment is required.
MAGFIT (Cast welding method)
-
1. Oral cavity before operation

An overdenture is made using the maxillary bilateral canines as the abutment teeth and the MAGFIT as a retainer.
-
2. Preparation of the abutment tooth

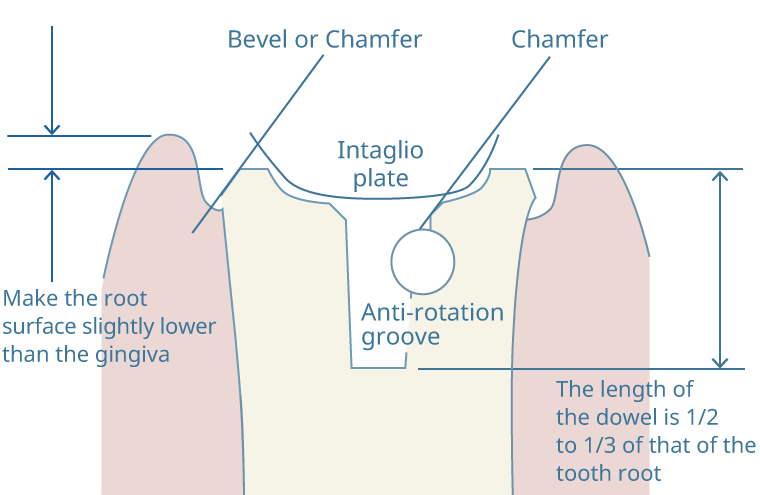
Prepare the root surface and root canal, make an anti-rotation groove, and prepare an abutment tooth.
-
3. Selection of MAGFIT

Check the base diameter and the tooth root cross section using a space gauge to determine a product to use.
-
4. Welding of the keeper

On the work model, the weld of the keeper to the wax mold should be parallel to the occlusal plane.
-
5. Coalescence of the root surface

After acid pickling and polishing the root cap to which the keeper is cast, cement it to the abutment tooth.
-
6. Securing of the magnet space

After positioning the magnet, insert the denture into the oral cavity and secure the space between the denture and the magnetic assembly.
-
7. Sandblasting

In order to increase the adhesive strength with auto-polymerizing resin, perform alumina sandblasting and apply a metal primer.
-
8. Coalescence of magnetic assembly

Perform the coalescence of the magnetic assembly 1–2 weeks after the denture adjustment is completed.
-
9. Completion of a magnetic denture

It is a state where the complete denture is attached in the oral cavity.
Provider of the clinical case: Professor Motonobu Miyao (Asahi University)
MAGFIT SX2
-
1. Abutment tooth formation and Root coping fabrication

Prepare the root coping referring MAGFIT RKR clinical procedure.
-
2. Impression collection

Collect the impression for the abutment tooth with keeper attached by using the personal tray.
-
3. Plastic dummy and Washer type spacer installation

Make a working model. Fix the plastic dummy on the surface of the foot coping, by wing the instant adhesive material, and press the washer type spacer to the keeper. Then, undercut area between the dummy and the coping should be blocked out with a model repair material.
-
4. Denture Fabrication

Polymerize according to a conventional method, remove it, and then polish the burr.
-
5. Removal of plastic dummy

Remove the plastic dummy with a groove such as a fissure bur. At this time, do not scratch the space for the magnetic assembly (particularly the side).
-
6. Removal of washer type spacer

Using an instrument such as Evans, remove the washer type spacer and tidy the inside.
-
7. Preparation of the magnetic assembly

Prepare the magnetic assembly. Attach the metal spacer to the attractive face and seal it with wax.
-
8. Mounting of the magnetic assembly

After temporarily attaching the magnetic assembly with cyanoacrylate, fill the space of the denture and the magnet assembly with self-curing resin by brush filling.
-
9. Removal of metal spacer

Remove the wax with a steamer and clean, then remove the spacer.
Provider of the clinical case: Nakao Dental Clinic (Onomichi City, Hiroshima Prefecture)
MAGFIT RKR
-
1. Preparatory treatment

After endodontic treatment, check the root canal in terms of the length, filling condition, curvature shape and the teeth arrangement through the radiograph.
-
2. Root surface preparation

Remove all the softened dentin to leave well-conditioned dentin on the surface of the tooth root.
-
3. Completion of root surface preparation

For easy installation of the MAGFIT RK please set the root surface parallel to the occlusal plane.
-
4. Root canal treatment

Standard root canal treatment is carried out using a Peeso's reamer. The dentin surface should be the same level as the gingival margin. The length of blockade area should be more than 3mm from the root apex.
-
5. Keeper trial

Trial fit the keeper post into the root canal. In addition, the distance between the keeper bottom surface and the tooth root surface should be as small as possible, and the keeper and the occlusal surface should be parallel.
-
6. Preparation for keeper insertion

Apply resin to the outside surface of the root post. Fill the root canal with composite resin before inserting the MAGFIT RK.
-
7. Inserting the MAGFIT RK

Apply composite resin to the outside surface of the keeper excluding the attractive face for a firm fit to the root canal. Insert the MAGFIT RK into the root canal.
-
8. Forming the resin copings

Polish and form the resin coping taking care not to damage the keeper.
-
9. Completion of resin coping

Remove excess resin to prevent gingivitis.
Provider of the clinical case: Nakao Dental Clinic (Onomichi City, Hiroshima Prefecture)

